WebRTC on Raspberry Pi: Live HD Video and Audio Streaming
Today we're going to talk about how we can stream low latency high resolution live video and audio to a web browser from Raspberry Pi using WebRTC. This one is going to be a long one, but the reward is worth the effort :)
Streaming to a web browser
When I was looking for some sort of live streaming solution for my Raspberry Pi, I've noticed that the majority of the Raspberry Pi tutorials on video streaming show you how you can set up a Motion JPEG or MJPEG based streamer. Now there are many MJPEG streaming applications/projects for RPi and they all are pretty simple to use. The actual problem with MJPEG is that it is bandwith hungry as all it does it streams a sequence of JPEG pictures at certain rate to a web browser. Hence, "Motion JPEG".
High bandwidth usage usually also means limited resolution or low FPS. Another problem is that MJPEG doesn't support audio (obviously) and some other audio implementation would be needed along with it.
I quickly realised that MJPEG simply won't cut it for me. For my personal project I needed a solution that would give me:
- Low latency stream (0.5s max)
- Low bandwith requirements
- High res video (800x600 bare minimum)
- Full duplex audio (two way audio between RPi and a client)
- Decent web browser support (at least Google's Chrome and Mozilla's Firefox) without any extra plugins (flash etc).
So after doing some research I actually found a solution - WebRTC.
WebRTC - A modern streaming solution
WebRTC is a free, open project that provides browsers and mobile applications with Real-Time Communications (RTC) capabilities via simple APIs. It allows audio and video communication to work inside web pages by allowing direct peer-to-peer communication, eliminating the need to install plugins or download native apps.
Now WebRTC isn't something new. Facebook's Messenger, Google's Hangouts, Discord... They all use WebRTC for their real time communication implementations.
And while WebRTC wasn't developed with the Raspberry Pi in mind particularly, we can actually use it for high resolution and low latency audio and video streaming. Our Pi in this scenario becomes a remote peer!
There are already few projects that aim to do just that and today we're going to use one of it to accomplish our goals:
WebRTC extension for the UV4L Streaming Server by Linux Projects
You can check UV4L page for a documentation, custom drivers and tutorials on how to install and quickly set up a UV4L Streaming server, but we'll take matters further and talk about more advanced stuff you can do with it.
The goal is to set up a U4VL streaming server to serve our own custom web streaming page and we're going to do so in this tutorial.
One thing that I should note in advance is that only one peer will be able to watch the stream at a time. Janus WebRTC Server can be used to make the stream available to more viewers. It is something that I'm planning to cover in the future, but for now check this tutorial here.
Alright so if you're still with me, let's continue.
Preparations
I've tested this with Official Raspberry Pi Camera V1.3 on Raspberry Pi 3 B+ and Raspberry Pi 4 running latest Raspbian OS (Raspbian Buster), but it should work on Raspberry Pi 1, 2 or Raspberry Pi Zero and Zero W as well.
Now I'll assume that you have your Raspberry Pi camera connected and enabled. If not, do so now and enable it with:
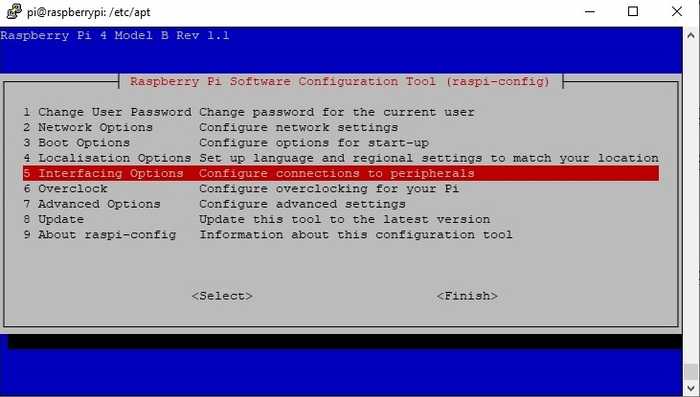
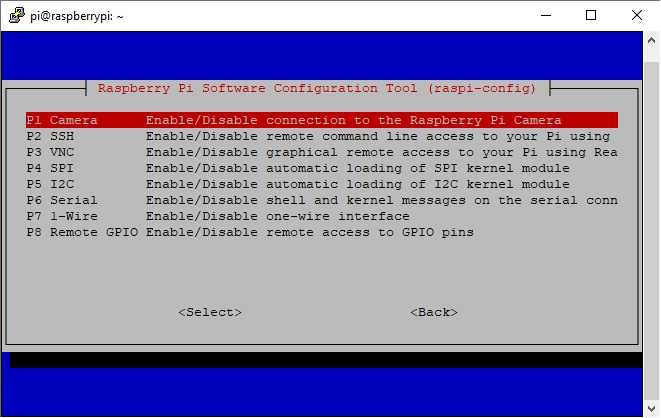
sudo raspi-configChoose Interfacing Options > Camera.
Click on Camera, choose Yes and reboot.
Installing and testing the UV4L streaming server
To install the UV4L streaming server, first we have to update the apt repositories list. So back in our Pi's terminal execute these commands:
curl http://www.linux-projects.org/listing/uv4l_repo/lpkey.asc | sudo apt-key add -Then:
echo "deb https://www.linux-projects.org/listing/uv4l_repo/raspbian/stretch stretch main" | sudo tee /etc/apt/sources.list.d/uv4l.listAnd finally:
sudo apt-get update && sudo apt-get upgradeNow we can install UV4L streaming server with the WebRTC extension.
If you have Raspberry Pi 2,3 or 4:
sudo apt-get install uv4l-webrtcAnd if you're on older versions like Raspberry Pi 1, Compute Module 1 or you have Zero or Zero W (Wireless):
sudo apt-get install uv4l-webrtc-armv6When that's done, launch the server:
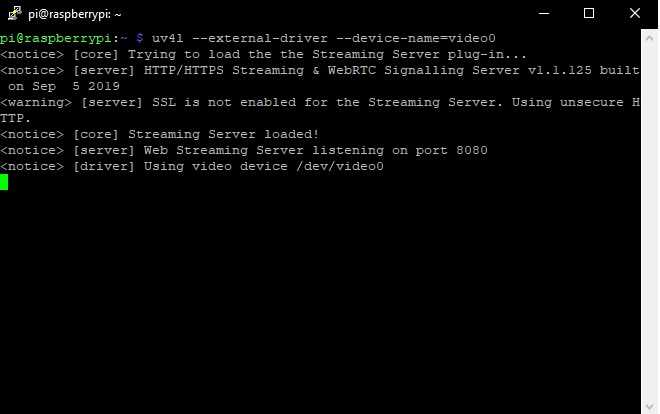
uv4l --external-driver --device-name=video0You should something like this in your terminal:
Those that are familiar with UV4L will probably notice that we're not using the UV4L raspicam driver. The reason is that for my personal project I need clean video stream and UV4L adds a watermark if you're using uv4l-raspicam driver. The --external-driver option tells UV4L to use different driver for the streaming. In our case an official Raspbian v4l2 driver will be used.
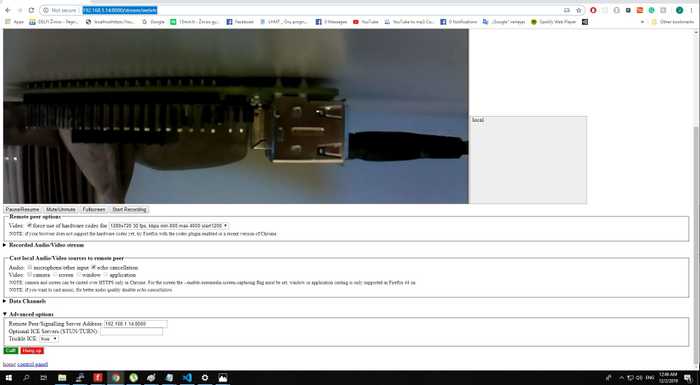
Alright, time to test the stream. Navigate to http://yourraspberrypiip:8080/stream/webrtc on your PC or smartphone, click the green Call button and a stream should appear.
Lots of stuff to play with, but the most important thing here (IMHO) is that we can force use of hardware codec. What that means is that we're using a hardware h264 encoder of VideoCore IV (RPi's GPU), which allows us to have HD Live stream with low CPU utilization and low bandwidth usage.
In case your video is upside down like mine is v4l2-ctl --set-ctrl vertical_flip=1 in the command line. v4l2-ctl is an application to control v4l2 drivers. Check this link for more examples.
The advanced stuff
As I mentioned earlier, my goal is to use UV4L streaming server for my own custom web page. UV4L documentation refers to it as a "WWW server".
Now, as you might have figured out, the above setup only allows the stream to be accessible by computers or smartphones that are connected to the same local network. To change that and to be able to watch the stream via the internet my plan is to simply do a port forwarding on my router.
If security is a big concern, I would suggest a VPN provider.
Obviously, if we're going with the port forwarding, simply exposing our Pi like that is a bad idea. Thats why we're going to encrypt our connection with OpenSSL (enable HTTPS) as well as add a password protection to our www server. Https is also required for certain WebRTC API's to work. e.g remote peer mic access.
The good news are that the UV4L Streaming server already supports all these things!
Serving the custom web page
For the simplicity sake and testing purposes we're going to serve the same UV4L WebRTC streaming page in this tutorial. I've split the html, css and js and hosted these files on Github for the convienence. You can grab it here https://github.com/Onixaz/uv4l-webrtc-front-end.git.
Place them in /home/pi/custom to follow along.
No code changes were made, everything is left in place for a reference. Feel free to edit these files, remove the things you don't need, change css or play around with Js! For more examples you can sudo apt-get install uv4l-demos. Demo filess will be installed in /usr/share/uv4l/demos/
Enabling HTTPS
Next we're going to generate self signed SSL certificates to secure our stream. You can opt for authorized certificates if you're building some sort of production-ready web streaming application, as self signed certificated will raise a warning like this.
Clicking on Advanced > proceed to... will still allow you to enter the web page, but just keep this in mind.
Alright, let's go back to the Pi's terminal and execute the command below.
sudo openssl genrsa -out /etc/ssl/private/selfsign.key 2048 && sudo openssl req -new -x509 -key /etc/ssl/private/selfsign.key -out /etc/ssl/certs/selfsign.crt -sha256This will generate two files for us. The private key and the certificate itself. During the process you will be asked bunch of questions like your company name etc... just leave everything blank.
Launching the HTTPS enabled server
We're almost done. Use the command below to launch UV4L HTTPS Enabled WWW server. Notice that the last two options are for password protection. When entering the streaming page, you will be prompted to enter the user name and password. In this case it will be: user:yourpassword. The command below also assumes you're hosting your web page files in /home/pi/custom
uv4l --external-driver --device-name=video0 \
--server-option '--enable-www-server=yes' --server-option '--www-root-path=/home/pi/custom' \
--server-option '–www-index-file=index.html' --server-option '--www-port=9000' \
--server-option '--www-webrtc-signaling-path=/stream/webrtc' --server-option '--enable-webrtc=yes' \
--server-option '--enable-webrtc-video=yes' --server-option '--enable-webrtc-audio=yes' \
--server-option '–-enable-webrtc-datachannels=yes' --server-option '--www-use-ssl=yes' \
--server-option '--www-ssl-private-key-file=/etc/ssl/private/selfsign.key' --server-option '--www-ssl-certificate-file=/etc/ssl/certs/selfsign.crt' \
--server-option '--user-password=yourpassword' --server-option '--www-password=yourpassword'
Tip: create a new file called server.sh, open it with a text editor, add #!/bin/sh at the top and copy the command above. Then simply execute ./server.sh to start the server.
You should see something like this below:
Except... you're running Raspbian Buster and probably got this nasty error :)
*Auto configuration failed
1995821812:error:25066067:DSO support routines:DLFCN_LOAD:could not load the shared library:ds o_dlfcn.c:185:filename(libssl_conf.so): libssl_conf.so: cannot open shared object file: No suc h file or directory 1995821812:error:25070067:DSO support routines:DSO_load:could not load the shared library:dso_ lib.c:244: 1995821812:error:0E07506E:configuration file routines:MODULE_LOAD_DSO:error loading dso:conf_m od.c:285:module=ssl_conf, path=ssl_conf 1995821812:error:0E076071:configuration file routines:MODULE_RUN:unknown module name:conf_mod. c:222:module=ssl_conf*
No worries. This is because the new OpenSSL running on Raspbian Buster (v1.1.1d) is incompatible with the old build of UV4L. I'm sure this will be fixed sometime soon, but for now, the workaround is to use the old openssl.cnf file from Raspbian Stretch.
You can grab it here. Just remove the _.txt part.
Thanks to https://blog.domski.pl/ for a tip how to fix this.
Place the file somewhere in Raspberry Pi and then export OPENSSL_CONF=/path/to/openssl.cnf in the terminal or navigate to /etc/ssl and replace the openssl.cnf with the one you just downloaded.
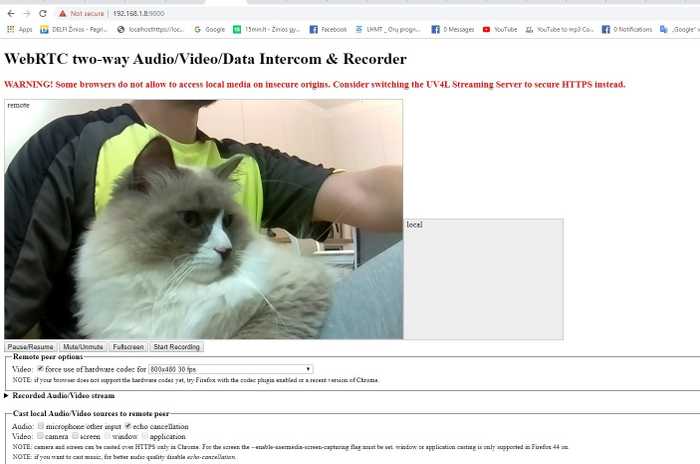
Try to start the server again and check the stream on https://yourraspberrypiip:9000/.
My cat seems to be impressed! ;)
Final remarks
And there you go, you got yourself a secure WebRTC streaming server.
We haven't discussed port forwarding much, because it is done differently on every router. Just make sure you forward the port your streaming server is using. On my case it is 9000. I suggest googling "How to port forward on Router X" and you should find a proper tutorial.
Another thing is actually starting the server on boot. There are many ways to do that, but the most simple and convenient for me is the systemctl.
Heres a quick guide. I'll assume you already created the server.sh script. Mine is located in /home/pi/custom/server.sh
sudo nano /etc/systemd/system/streaming.serviceCopy the stuff below:
[Unit]
Description=UV4L Streaming Server

[Service]
ExecStart=/home/pi/custom/server.sh

[Install]
WantedBy=multi-user.target
Then Crtl+O > Enter > Crtl + X. Then back in Pi's terminal:
sudo chmod 664 /etc/systemd/system/streaming.serviceNext:
sudo systemctl daemon-reloadAnd finally:
sudo systemctl enable streamingYou can check the status, start and stop the streaming server with sudo systemctl status streaming , sudo systemctl start streaming and sudo systemctl stop streaming respectively.
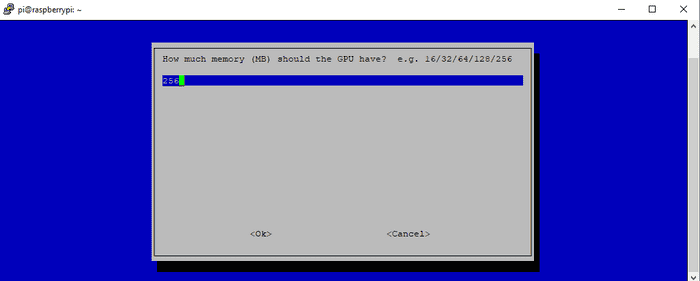
Last thing I'd like to note is that you might need to allocate more memory to the GPU if you're having problems with h264 streaming. It is done by typing:
sudo raspi-configThen Advanced Options > Memory Split.
On Pi 4, I have dedicated 256MB of memory.
Anyways, if you found any errors or got questions, leave them in the comments section. I'm planning on releasing future tutorials covering UV4L and WebRTC. We still have to discuss how we can modify our custom web page and use built-in data channels so stay tuned for those.
But for now I bid you farewell!

