Edge AI: Semantic Segmentation on Nvidia Jetson
Hi, in this tutorial I'll show you how you can use your NVIDIA Jetson Nano/TX1/TX2/Xavier NX/AGX Xavier to perform real-time semantic image segmentation.
We'll start by setting our Jetson developer kit. Then I'll show you how to run inference on pretrained models using Python. Finally, I'll show you how to train your own custom semantic segmentation model.
Let's get started!
What is Semantic Segmentation?
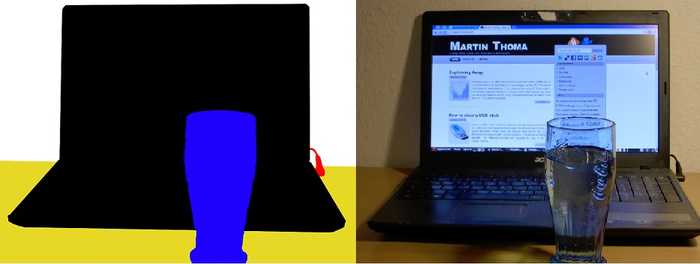
Semantic segmentation is a computer vision task in which we classify and assign a label to every pixel in an image. At the end of the process, we get a segmented image like the one in the picture below.
Pictures by Martin Thoma
Essentially, semantic segmentation helps machines distinguish one object from another and understand what is in the image or detect boundaries of each object with pixel-level precision. That is why semantic segmentation is so widely used in robotics, autonomous vehicles and medical imaging.
Of course, exceptional accuracy is required for semantic segmentation in medical images and it is unlikely that a Jetson device will be used for such tasks.
However, Jetson devices are amazing when it comes down to robotics or autonomous vehicles. Nvidia Jetson excels in situations where power consumption, size, and the ability to perform computer vision tasks in real-time matter the most.
Performing semantic segmentation on Nvidia Jetson
So if you just got your Jetson developer kit, first thing you have do to is to grab the Jetpack SDK, which comes with the Linux OS and all the libraries and drivers that you'll need for your developer kit. Follow instructions on Nvidia's site at https://developer.nvidia.com/embedded/jetpack to download and get started with your kit.
Next, we'll need to get the jetson-inference library from the Hello Ai World Github page. This library provides all the tools you need to deploy classification, object detection, and semantic segmentation models on your Jetson device.
Under the hood, this library uses NVIDIA TensorRT, a library that significantly increases the performance of our deep learning models when we're performing inference on Nvidia GPUs.
So now that your Jetson is up and running, let's open the terminal, install dependencies and clone the library.
cd~
sudo apt-get update
sudo apt-get install git cmake libpython3-dev python3-numpy
git clone --recursive https://github.com/dusty-nv/jetson-inference
Now we're going to build this library from source:
cd jetson-inference
mkdir build
cd build
cmake ../
make -j$(nproc)
sudo make install
sudo ldconfig
Along the way, the setup will ask you whether you want to download various models and Pytorch for your Jetson. Feel free to skip installing Pytorch for now since we won't be using it in this tutorial. At least not on your Jetson device.
Refer to the official guide at https://github.com/dusty-nv/jetson-inference/blob/master/docs/building-repo-2.md if you're having problems with installation.
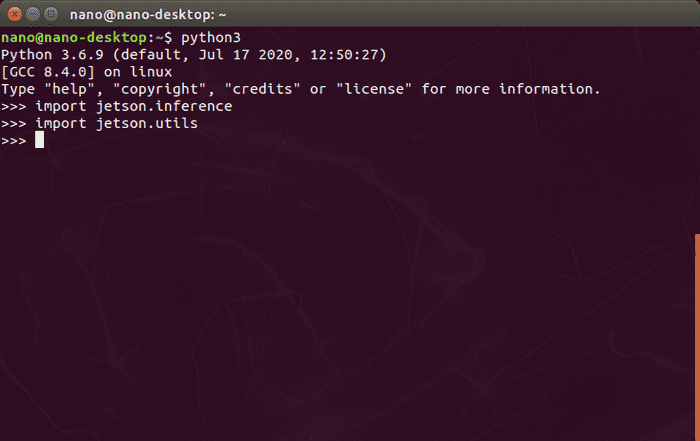
To theck if everything went sucessfully, lets open Python interpreter in a terminal:
python3And import the following:
import jetson.inference
import jetson.utils
jetson-utils is another library that gets installed along with jetson-inference for easy camera access, CUDA functions, etc.
Successful import without any errors indicates that everything is ok and we can test pretrained models!
Testing pretrained semantic segmentation model
Python examples reside in jetson-inference/python/examples directory.
Lets navigate to that directory and run:
python3 segnet.py /dev/video0 --width=640 --height=480This will run a simple camera test using fcn-resnet18-voc-320x320 model pretrained on Pascal VOC dataset.
In case you don't have a camera attached to your Jetson, you can simply use a video file:
python3 segnet.py /path/to/video.mp4Check python3 segnet.py --help for other options or how to load different networks/models.
Voila! As you see it runs pretty well even on Jetson Nano and the accuracy is pretty darn good for a 99$ computer!
Training custom semantic segmentation model
Ok so now that we know how we can run inference on our little device, let's talk about how we can train a custom model on our own data.
But before we begin I'd like to note that the training should be done on a modern desktop PC, preferably with a GPU. The Jetson developer kit is not designed for such task and would take way too long to train even a simple model.
So this guide will assume that your host machine is running Ubuntu 18.04 or Windows 10 and has Nvidia GPU with CUDA 10.0 and cuDNN 7.6.5 installed. You can find guides on how to do that on respective links. Make sure you have exactly these versions to follow along.
You will also need Git as we'll be using it to download the tools and the code for this project.
You can check the version of CUDA with nvcc --version command and you can have multiple CUDA versions on your system in case you have some other than v10.0 installed already.
For the training itself, we'll be using Pytorch, an open source machine learning framework created by Facebook.
Now since we'll be using a specific version of Pytorch I recommend getting Conda, which is an open-source package and environment management system. We will use Conda to isolate our project (in case you have a different version of Pytorch installed already)
Getting the tools
The training code is hosted on my Github repository at https://github.com/Onixaz/pytorch-segmentation.
It is based on official Pytorch segmentation example, which was tweaked by Nvidia developer Dustin Franklin to make it compatible with TensorRT inference accelerator and then further tweaked by me for training on custom data.
So without any further ado, let's open our terminal and start by cloning the repo to our host PC:
git clone https://github.com/Onixaz/pytorch-segmentationNext we'll navigate to our cloned repo and create conda environment:
cd pytorch-segmentation
conda create -n segmentation --file requirements.txt
I named my environment segmentation, but you can name yours whatever you want.
Next lets activate it with:
conda activate segmentationAnd install Pytorch:
conda install pytorch==1.1.0 torchvision==0.3.0 cudatoolkit=10.0 -c pytorchAs well as onnx and pycocotools:
conda install onnx pycocotools
Windows users should use pip to install these libraries: pip install onnx git+https://github.com/philferriere/cocoapi.git#egg=pycocotools^&subdirectory=PythonAPI
And finally depending whether you're going to use your own data for training or not, I suggest installing this image annotation tool called Labelme.
pip install pyqt5 labelmeAnd that's it! We're ready for training!
Getting the data
To showcase the the process of a training I'm going to use Pascal VOC 2012 dataset just to save myself from the pain of annotating thousands of images. In case you're using your own images, let me show you how you should annotate them using Labelme.
Before you start annotating your images, you need to create a file called classes.txt.
Inside this file you'll have to list all the classes (labels) that you're going to use in your dataset starting with background class (the "undetermined" class). E.g.
background
cat
dog
And so on.
And while you're at it, create another file called colors.txt and list RGB values for your classes. This will be used later for visualizations. E.g
0 0 0
255 0 0
0 0 255
If you want your background to be black, your cat - red and your dog class - blue.
Look into Pascal VOC 2012 classes.txt and colors.txt for a reference.
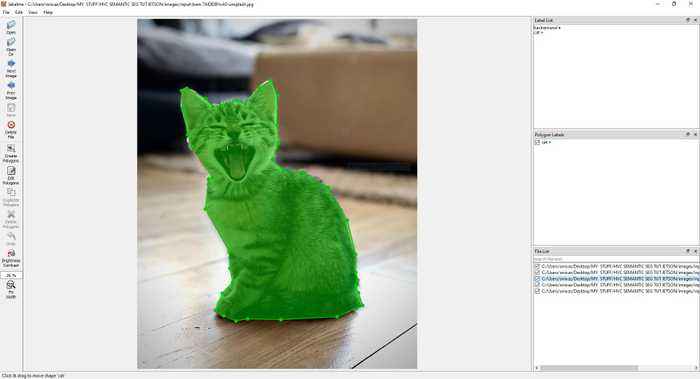
Now you can launch Labelme. Inside directory where your classes.txt reside, open a terminal/command promt, activate you conda environment and type:
labelme --labels classes.txt
Depending on your data and the number of classes, you might need to annotate somewhere between 150 to 1500 images for your model.
Network that we're going to use is already pretrained on ImageNet dataset. This means that you won't need to annotate thousand of pictures just to get decent results.
Start with Open Dir, navigate to your images folder, then click Create Polygons, start annotating and when you're happy with the result, choose the label (class) and click Save. Rinse and repeat.
Ok now you should have your annotations in .json format inside your images folder.
Next you need to navigate to the pytorch-segmentation directory. The one we cloned earlier. Inside there is a python script that will convert your .json annotations to .png image masks.
python labelme2voc.py /path/to/your/images/folder /path/to/desired/output/folder --labels /path/to/classes.txt --noviz
Ok so now whether you downloaded the Pascal VOC 2020 dataset or annotated your own images and then converted to Pascal VOC dataset format, you should have ended with at least two directories called:
JPEGImages and SegmentationClass.
As I said earlier, one should contain the images and the other one should contain annotations/masks in .png format.
Next we will split this data into train and validation splits. For this particular task, I've prepared split_custom.py script which resides in pytorch-segmentation directory as well.
Now make sure you're still in pytorch-segmentation diretory and have your segmentation environment activated.
Next, edit your paths and run this command:
python split_custom.py --masks="path/to/your/SegmentationClass" --images="path/to/your/JPEGImages" --output="path/to/your/output/dir"
Training using Pytorch
Now we can actually start training our model. But before we do that let's see what the training script has to offer:
python train.py -hAs you see you lots of options here, but the bare minimum to start training is:
python train.py /path/to/your/split/data --dataset=custom. The default number of classes is 21 (as in Pascal VOC 2012), make sure you set the proper number for your dataset with --classes
Windows users need to add: --workers=1
Here we only have to specify a path to our data and that we're using a custom dataset.
Now I suggest sticking to the default neural network architecture - fcn_resnet18 for real-time inference on Jetson Nano.
Fully Convolutional Network (FCN) with pre-trained ResNet-18 as a backbone (encoder). If you're training for inference on AGX Xavier or Xavier NX or you need better accuracy you can try deeper backbones like ResNet-34 or even Resnet-50. The tradeoff here is between the accuracy and speed, so keep that in mind.
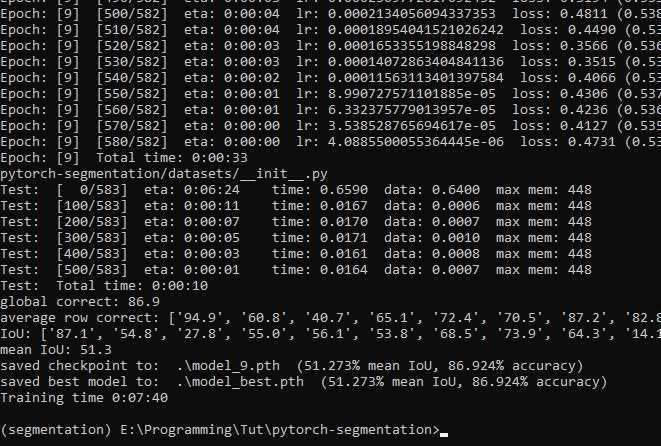
It should take you about 10 epochs to get to 86% accuracy on Pascal VOC 2012 dataset, which is the same as specified on the Hello AI World Github page. I suppose this means that the training pipeline works correctly and now all we have to do is to deploy our model to our Jetson device.
Deploying the model
Now while we could deploy our model_best.pth file and run inference using Pytorch directly on Jetson, this is not an optimal way.
As you recall, jetson-inference library runs TensorRT under the hood and we'll take an advantage of it. To make our model TensorRT compatible first we'll have to convert it to ONNX format.
ONNX is an open format developed by Microsoft together with Facebook to allow developers easily move their machine learning models between different frameworks.
That is simply done by running:
python onnx_export.py
Finally we can move this new file called fcn_resnet18.onnx along with classes.txt and colors.txt we created earlier to our Jetson device.
Now assuming you moved those 3 files back to jetson-inference/python/examples directory, simply run this command:
python3 segnet.py --camera=/dev/video0 --model=fcn_resnet18.onnx --width=640 --height=480 --labels=classes.txt --colors=colors.txt --input_blob="input_0" --output_blob="output_0"
Note that the first time you load your ONNX model, it will take about a minute to convert it to TensorRT compatible format. The so called "engine" file will be generated based on your network definition. If you want to learn how exactly TensorRT optimizes your model, look into the official TensorRT developper guide.
Conclusion
One thing I'd like to add is if you're wondering how you can include this "optimized inference" into your own project (e.g OpenCV), I suggest checking out examples in jetson-utils repo.
For other examples, questions, updates and resources, once again, make sure you check Hello AI World Github page.
And that is basically it. Hope you find this useful and as always leave your questions in the comments below.
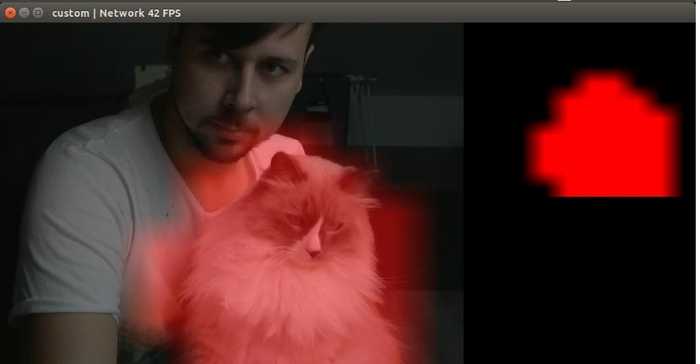
Me and my segmented cat wish you all the best and see you next time!
